Monday, November 18, 2013

Assignment 4: Specular Control

This exercise is all about specular control. Aka, knowing that many times your light source will be fairly well reflected in some shiny object in the photo (glasses, metal, furniture, etc.) and using that to your advantage by creating the desired reflection. Sometimes this might be maximizing reflection by making the source very small and harsh, other times it will be minimizing the reflection by making the source very large and diffuse.

http://www.flickr.com/photos/eric_spaeth/10938848716/
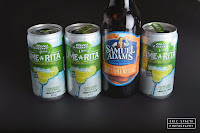
For my subject today, I chose a few empty beverage containers that happened to be lying around my desk. One being glass is highly reflective, the other 3 being printed aluminum have less reflection. I wanted, with my limited resources to have a vertical, lengthwise reflection for the primary source, so I bounced my Auto128 flash from behind the cans to the right, onto a large white sheet of foamcore. This turned my flash into a 30"x40" rectangular light source, which also helped to minimize the shadows on the background. In addition, I provided a bit of fill from the left with a couple sheets of copy paper.

I'm pretty pleased with the results, though I didn't do a whole lot of playing around with this. I plan to in the future, but tonight I wanted to get through something since it's been a few weeks since I made any progress.


Sunday, October 27, 2013

Assignment 3: Apparent Light Size

Time for another assignment. This time we are talking about apparent light size, also referred to as "softness". What's the point? It all affects the look and feel of an image. Lights that very small (relative to the subject) give very sharp, crisp edges. This tends to give an image a much different feel than if that same subject were lit using the same AMOUNT of light, but it was coming from a much bigger area. Think of a stage, an actor could be lit with a spotlight (sharp, directional), or you could turn on the lights in the theater (soft, omnidirectional).

For my subject, I opted against the recommended piece of fruit (...or just forgot that it was the suggested subject) and went with a small figurine I obtained from a vacation in Mexico. I lit it in four different ways, increasing the apparent light size each time.

1) Bare Flash from ~8 feet (size: point source)
2) Flash with a single sheet of printer paper bent around the front from 8 feet (size: a few sq. inches)
3) Flash behind a curtain draped over my arm from 8 feet (size: 1-2 sq. feet)
4) Bare Flash at 8 feet pointed away from subject at corner of the room (size: many sq. feet)

I adjusted the aperture (and ISO in the case of the wall bounce) to get similar exposure based on the histogram, since the various ad hoc diffusers would eat some unknown amount of flash power. Only in the wall bounce picture did a very small amount of ambient begin to leak in as indicated by a no-flash image. Here's the results.

The first thing I noticed was not related to softness, but rather the color shift that occurred with the diffusers. All pictures were taken on flash white balance, but clearly the diffusers are shifting that warmer, which makes sense, since none of them are pure white, and in the case of the walls, beige.

The bare flash clearly gives the sharpest shadows, even to the point of showing the texture of the printer paper beneath the figurine. Whereas the wall bounce flash is difficult to even detect the shadow.

Overall, softness looks very useful for adjusting the overall emotion or feel that an image elicits.

Link to Strobist Blog Post for this Assignment

Thursday, October 24, 2013

Assignment 2: Position and Distance

Another evening, another assignment (and the realization that this pace will probably not last much longer). This time, we play with distance, rather than angle. Having an engineering and physics background, I had no problem with the theory of what was to come. I had not, however, ever implemented this. If you recall, I'm working with a one trick pony flash, which made the distance adjustments a bit more than I was expecting. Rather than being able to dial my flash power down, I was at the mercy of my aperture. This ended up being less of a problem than I initially thought, although it did mean my composite image was not consistently focused due to the wide range of apertures (f22 to f2.4) and short distance between the camera and the objects (about 1 foot).

To paraphrase the point of the lesson, notice how the subject remains relatively equally exposed in all three slices, while there is a rather dramatic change in the background. Flash to subject distance increases from left to right. On the left, the distance between the flash and the subject is about half of the distance between the flash and the backdrop. This makes the flash significantly more powerful on the subject due to "the rule which must not be named, let alone explained". Inversely, on the right, the flash is "very far" (that's a technical term) from both the subject and the background so the small difference between their respective lengths does very little for the light intensity.

All in all, this was a good lesson and I can see how this will become a very powerful tool in the future. I do, however, look forward to repeating it once I acquire a more flexible flash unit such as a used Nikon SB-24, you know, one with knobs and buttons that actually do something.

Wednesday, October 23, 2013

Assignment 1: Position and Angle


The first assignment is fairly basic, though not without it's own challenges for me. For starters, I'm working with an ancient and limiting flash, a Minolta Auto 128 that I'm not entirely certain whether or not it is functioning properly. It comes complete with a rotary dial calculator that as far as I can tell isn't actually attached to any electronics on the inside. (Not that I would dare ignore numerous warnings against opening up a flash...) but also comes with a M-Auto switch that also seems to accomplish nothing. In the end, it's basically a one trick pony, though seems to do the trick at about f5.6 and 10ft of separation. For Sync, I'm using the LumoPro Miniphone cable kit (available at http://mpex.com/strobist) so there's a 12' cable laying around, but thus far, that's not an issue. My light stand consists of my hand and a conveniently sized curtain rod for consistent height from the floor.

Now, onto the picture (click image to load it in Flickr):


My subject is everyone's favorite Blizzard plushie, the Wyvern Cub. I chose this first for it's top notch cuteness factor, as well as it's numerous curves and features that should help better demonstrate the assignment.

Obviously, the main goal of this exercise is to demonstrate how much more lighting control you gain by not limiting your flash to be "on-axis" with the camera. I was particularly surprised by how much of a difference there was even with just 30° of separation between the camera axis and the flash. The image very quickly moves from washed out and boring, to really showing some of the details of the subject, starting with the major features such as the nose. Moving to 60°, we start to get some definition around the folds in the ear and wings. At 90°, the mood starts changing with the harsh side light and relatively dim ambient fill on the shadows.

Overall, this has been a good starting experiment. While I knew the overall effect I would get going into it, I was still surprised and intrigued by the finer details that this exercise made apparent.


The First Post

Up until now, I'd be mostly described as a photography hobbyist who has decent gear and some talent (that's not bragging, it's an empirical fact, particularly due to masterful use of the adjective "some") who can make the occasional nice picture. I took a photography class in high school, did little with it through college, but got back into it with the purchase of a DSLR (Nikon D5000). I'd like to move beyond "hobbyist" to "serious amateur" and hope to document my progress here, if for no other reason than it might be cool to look back in a year or two.

My plan is to start by putting myself through the Lighting 102 exercises over on the Strobist Blog. That is the extent of my plan thus far.